How to change proofing language in PowerPoint
It’s surprisingly easy to find yourself with a variety of different proofing languages set on different placeholders and text elements in your PowerPoint presentation. If the languages are not set consistently in your presentation, the spell checker will not work properly, which will make proofing your decks a lot harder.
Despite searching for a long time I couldn’t find one place that explained why this happened, and how I could overcome it. So I decided to write my own. In this article, we’ll explain how this happens, and how you can make sure it isn’t a problem for you any more. 👍😅
How to set language for the whole presentation
Making language work consistently in PowerPoint requires aligning the language in 4 places.
Existing content language
Default editing language
Keyboard language
Proofing language
If you’ve experienced your proofing language changing unexpectedly, or the automated spellcheck not working it’s likely to be because one or more of the above are set to different languages causing unpredictable behaviour.
If you check these 4 things are all aligned then you shouldn’t have any problems. It’s less complicated than it sounds honestly — let’s dive in!
Existing content language
This is the language or languages that are set on individual placeholders and text elements in your presentation. To see what is set in each case, right click on the status bar at the bottom of PowerPoint and make sure Language is enabled by clicking on it (you will see a check mark appear to the left).
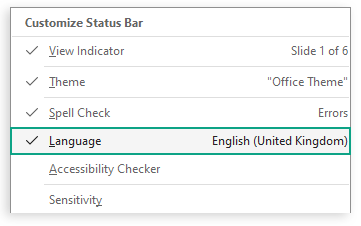
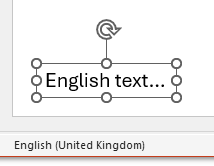
This will display the proofing language in the status bar for whatever element you click on, as shown below.
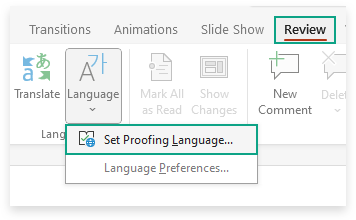
To change the proofing language you need to select the text box or placeholder and go to Review > Language > Set Proofing Language… or click on the language name in the status bar.
You can select and change proofing language for multiple text boxes on a slide. To change it for a whole presentation at once however, you’ll need an add-in like BrightSlide.
Default editing language
If you have the Language displayed in your status bar as described above, then you will see the Default Editing Language whenever you have nothing selected on the slide.
The default editing language will be applied to any new content elements that you add. So for example, if it is set to English (United States), when you add a new slide, the text placeholders will have their proofing language set to English (United States) too.
NOTE: this doesn’t affect existing content, so if you add extra text into an existing text box then it will keep the existing proofing language. Except when it cannot due to the keyboard settings - we cover that next.
It can be set using VBA pretty easily if you are already comfortable using the Developer tab. There is a list of languages on Microsoft’s website - simply change the msoLanguageIDEnglishUK part to the language you want to set.
Sub ChangeDefaultLanguage()
   ActivePresentation.DefaultLanguageID = msoLanguageIDEnglishUK
End Sub
Alternatively, you could install the brilliant and free BrightSlide add-in, which can do this for you (File & Master group, Review > Presentation Language. As a bonus it will also set the language on all your existing content too.

Keyboard language
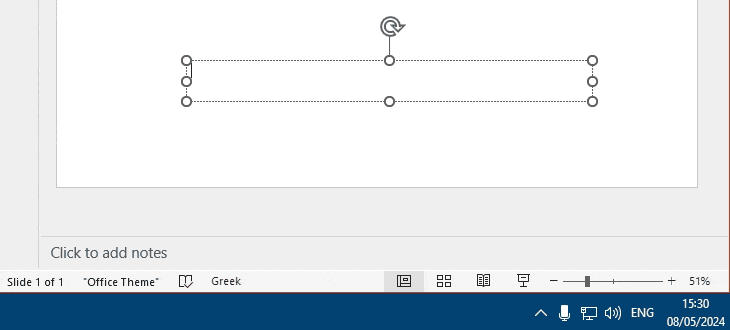
This is configured in Windows rather than PowerPoint, and you need to set it to match the language you are authoring in. Problems occur when you are trying to edit content in PowerPoint using a language that relies on a different keyboard. For example, if you are trying to work on a presentation in Greek but your keyboard is set to English (United Kingdom), what you will find is that you add a text box - it will show that it is set to Greek. However, the moment you start typing it will switch to English (United Kingdom). 🤯😭
To make this work, you need to make sure that keyboard language is set to the same as your existing content and default editing languages. Then any new content or edits to existing content will be set correctly too.
Once you have installed more than one keyboard layout, you can use the Language bar to switch between them. You should see this to the left of your clock in the Taskbar — mine is marked with ENG for English (United Kingdom).

If you already have the necessary languages installed then you can switch between them here, or using keyboard shortcuts: Left Alt + Shift, or Windows Key + Space.
These instructions from Microsoft show how to add extra language keyboards.
If you want to get fancy you can set your keyboard languages to only apply to a particular application. Doing this lets you restrict the keyboard change to just PowerPoint, however - speaking from personal experience - it also increases the likelihood of confusion.
Proofing language
Finally, so that PowerPoint can successfully check spelling, you need to make sure that you have the correct proofing language installed as well.
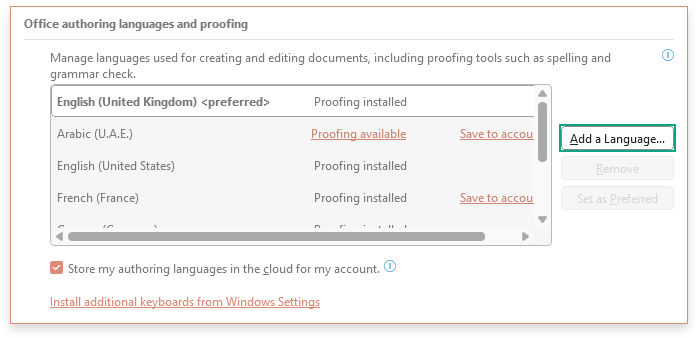
Proofing languages are managed in PowerPoint under the Review tab Language > Language Preferences….

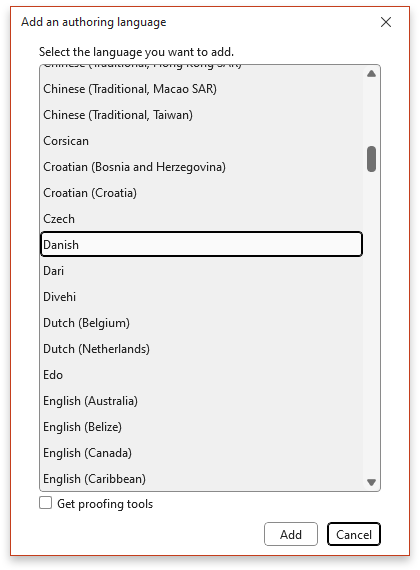
To add another language, click the Add a Language… button
This brings up the dialog below, where you can choose the language you need. Check the Get proofing tools box before you click Add to ensure you can use it for spell checking.
In conclusion…
If you make sure your languages are set consistently in the above 4 places, then you should find they become much more predictable and easy to manage.
We really hope that this article helps you wrestle control of the languages in your own presentations. Please let us know in the comments if this helped you, or if you have found any problems we haven’t covered here. We’d love to hear from you, and it can help others who find their way here too.